
No products in the cart.
Blog
How to Make a Minecraft Server | 12 Steps to Create & Host Your Own Free Server
18
Feb
Feb
Over 200 million copies of Minecraft have been purchased globally. In multiplayer worlds, kids and adults from all over are mining, crafting, and playing Minecraft together. By collaborating online, players develop their social skills, problem-solving techniques, and creative faculties. Amazingly, there are numerous benefits to playing Minecraft.
You can’t control exactly who connects to the public servers, and as a result, who your child is interacting with online. On a public internet server, players can collaborate to create bigger and better things than they could have made alone. The good news is that you can control who connects to and participates in your child’s virtual worlds by setting up your own server.
To help you get started hosting your own Minecraft server for your student, we’ve created some instructions. These were produced with the help of iD Game Plan, the same learning management system that campers use.
First, something crucial.
These instructions are for parents helping their children, so please read them before attempting any of this at home. Therefore, children MUST ask their parents’ permission and pick a time when they can supervise and assist. Anyone with your external IP address will be able to join your server and play in your Minecraft world if you set up and run an online server. When inviting people to play on your server, be careful.
Make sure you’re keeping track of who you and your child are inviting to play on your server. Only inviting players you know in person is the best way to maintain the security and happiness of your server. There are many nice people on the internet, but by restricting your server to people you’ve met, you won’t be surprised by who your children are talking to.
Creating a Minecraft Server.
You can find written setup instructions after watching the instructional video that is posted below on how to create a Minecraft server. Wishing you luck.
PC setup guidelines:.
1. Check to see if Java is the most recent version.
Our first step is to make sure you have the most recent Java version because Minecraft is a Java-based game. Download Java here if you don’t already have it.
Related link:
https://noithatxinh.Net.Vn/wp-admin/profile.Php
https://docs.Google.Com/spreadsheets/d/1zDvAAKMMg_BEd9avD09zMFGk7iVplXK9Y5k8rF9drDo/edit#gid=1495783700
Refer to the Minecraft online server setup Wiki article if you need troubleshooting assistance. PLEASE NOTE: Some server problems require you to change important computer settings. Your computer could be harmed if you do this incorrectly.
2. Get Minecraft_Server now. Jar .
Next, you’ll need the server files. You can get these for free from the official Minecraft site :
1. Go to the Minecraft Server Downloads page and download minecraft_server.1.11.jar.
2. Once the download finishes, copy minecraft_server.1.11.jar into a new folder on your desktop and call this folder “Minecraft Server”.
3. Double-click minecraft_server.1.11.jar to run it.
Along with it, some new files will also show up in the folder.
Note: Over time, Minecraft will update to a new version, so “1.11,” the version at the time these instructions were written, will be referring to an older download. Despite this, the instructions above and below should still work. Just be aware that “1.11” will be changed to the new version number.
3. Save as a Batch File to Run Server.
1. Right-click inside the Server folder where you put the Minecraft_Server.1.11.jar.
2. Select “New” > “Text Document.”
3. Name the new document “Run.”
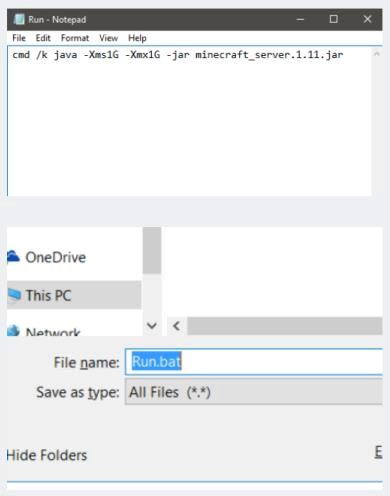
4. Inside the Notepad document, paste the following line:
Java Xms1G Xmx1G jar minecraft_server 1 cmd /k. 1.11. Jar .
Change “minecraft_server” if you’re using a different server version. 1.11. Jar” to reflect the name of the version you’re using.
Now “Save As” a batch file, which is a type of file that Windows uses to execute command-line instructions.
5. Click “File” > “Save As.”
6. In the field “Save as Type,” select “All Files.”
7. Set the file name to “Run.bat”.
Important: Be sure to remove the .Txt from the filename.
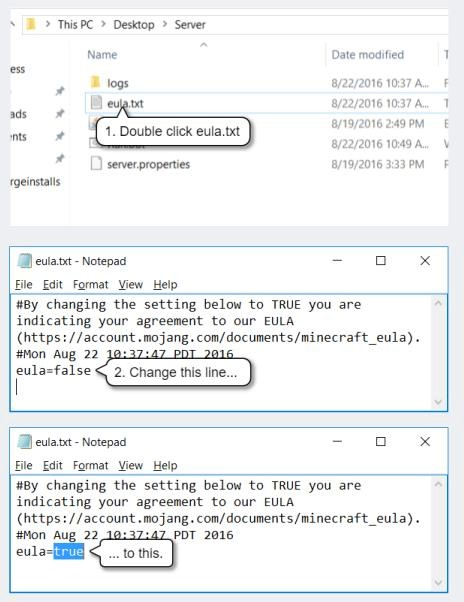
4. I accept the EULA.
Before starting a Minecraft server, you must accept the license agreement that is presented to you. The file eula needs to be edited. Txt to let someone know you agree.
1. Just click eula twice. Txt.
If you copy and paste the text from the file, you can read the EULA here.
2. Replace the eula=false line with eula=true.
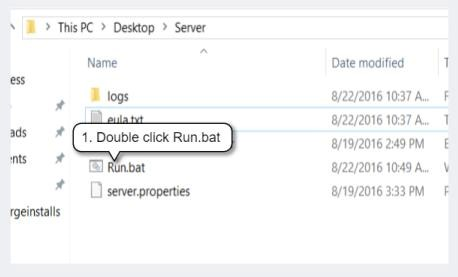
5. Start up your server.
You can now start your server’s launch.
To start your server, double-click “Run . Bat.”.
Your server’s information will be displayed in a window. Your server will be active and accessible to players as long as this window is left open.
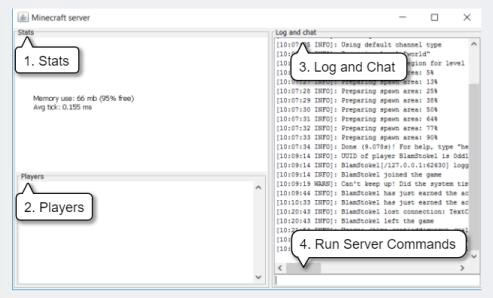
Server Window.
Even when you’re not in-game, your server still gives you access to some information that will allow you to stay informed of what’s happening.
1. You can see how much memory the server is using in the Stats panel.
2. You can check who is currently connected to the server in the Players panel.
3. You can see server messages and player chats in the Log and Chat panel.
4. You can use the field on the bottom-right to enter server commands.
Advanced users can control their server more with the help of server commands. A complete list of all available commands can be found here dot.
6. Sign Up for Your Server.
It’s now time to connect to your Minecraft server.
1. Run Minecraft.
2. On the main menu, click “Multiplayer.”
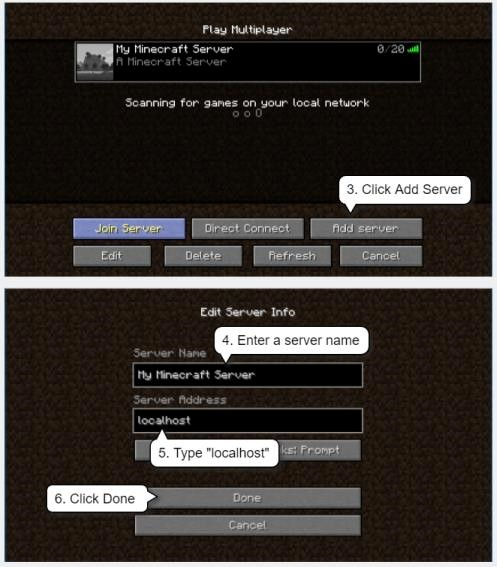
3. Click “Add Server.”
4. Name your server in the “Server Name” field.
5. Type “localhost” in the “Server Address” field.
6. Click “Done.”
7. Select your server and click “Join Server.”
Playing on your personal server ought to be possible at this point. We’ll then configure the internet connection so that other players can access it.
7. Redirect Your Ports.
Making changes to your router’s settings will enable others to access your computer through it in the following step of the process. Everyone’s experience with this process will be unique because it depends on the type of router they have.
1. Before you begin, read this page on portforward.com that offers some basic information on port forwarding.
2. Go to this link for a list of port forwarding guides.
3. Select your router’s make and model from the list and follow the instructions provided.
There are a few things you can try if you can’t find your router on the list on that website:.
If you can locate the manufacturer but not the model:
Try following the instructions for the nearest number you can find to your model. Frequently, they involve similar processes.
Look up your router’s model and “port forwarding” online.
For information on port forwarding, get in touch with the customer support for your router.
8. You can locate your external IP address.
Finding your external IP is necessary after you have forwarded your ports.
1. Open a browser and go to google.com
2. Type “external ip” in the search bar and press “Enter” or “Return.”
3. Google will tell you your external IP address.
Your external IP address will either be IPv4 or IPv6, and it will resemble one of the examples below:.
You’ll need this number so that other people can connect to your server when you find your external IP address.
9. Link up to your server.
Now that you’ve port-forwarded your connection, other players can connect using your external IP address. Have players joining your server follow the steps below:
1. In Minecraft, click “Multiplayer.”
2. Click “Add Server.”
3. Enter a server name.
4. Enter the server address.
This will resemble the address in the right-hand image and will be your external IP address followed by the port number: 25565.
Use [] characters to enclose your IPv6 address if you have one, as in [2001:0db8:0a0b:12f0:0000:0000:0000:0001]:25565.
5. Click “Done.”. Attempts to connect to the server will now be made by Minecraft. Select the server and click Join Server after connecting.
Invite Players: Anyone to your Minecraft server that you provide with your external IP address will be able to join. Verify that anyone you invite to play is someone you can trust. It’s best to only invite people you know. Before allowing new players to join, consult your parents.
10. Modify the server . Properties file.
Using the Server . Properties file located in the Server folder, you can also change a few game settings.
You can edit the file’s lines by opening it in any text editor and changing the settings for your Minecraft world.
The most typical characteristics you might modify are:.
On the Minecraft Wiki ., You can find a reference for every option.
Editing Server Properties: Nothing in this file needs to be changed for your server to function. Make no changes to the file unless you are certain of what you’re doing.
Recap .
And that’s it! Always get your parents’ permission before setting up an online server, and you must download the server software from Minecraft and use port forwarding to give other people access to your server.
Remember to Try This! You can verify the steps and get more details on setting up servers here dot.
You can find instructions here . If you have a mac.
If you follow these instructions, you’ll be able to create your own Minecraft server where you, your children, and their friends can all play together. You can then share your connection information with anyone you know to invite them to join you in creating and building in your world.
You’ll be surprised at how much kids can do when they collaborate if you create a server, so make sure to log in occasionally to see what the players are building.
And don’t forget that you can advance your child’s abilities with our brand-new Online Private Lesson, Minecraft Server Development, where children can learn to run a Minecraft server, upload maps, and hone their planning and design abilities. Also, be sure to check out any of our wildly popular Roblox coding classes and Minecraft summer camps, which are offered both online and on-site at esteemed universities across the nation.